
Are you looking for an outdoor project this spring? Is your yard looking a little dull? Do you need an outdoor spot to relax after a long day? A unique water feature such as a garden pond could be just what your landscape is lacking. So take your yard to the next level this season by adding a customized garden pond embellished with fountains, water lilies, koi fish, stones, flowers, and even romantic lighting. Follow these five steps to create a gorgeous, low-budget pond that will liven up your landscape!
Pick a Location
First and foremost, choose the location where you’d like your pond to be featured. Ideally, your pond should be installed in an area with fairly level ground and healthy soil. When choosing a location, consider the amount of sun and shade your pond will receive in a given area, noting that more sunlight will give you a variety of plants to choose from. Avoid areas with large trees, as their leaves, needles, and roots may interfere with your pond’s ability to thrive.
Prepare the Area
Once you have decided on a location for your pond, prepare the area by lining the preferred shape of your pond with rope, chalk, or a garden hose. Next, use a spade or shovel to create your stone border outline, approximately 3 inches deep and 1 foot wide. After digging the border, you may begin excavating the bed of your pond. The bed should be a minimum of 18 inches deep with a modest slope. Next, level out the base as much as possible, covering it with material such as newspaper, sand, or old carpet to cushion the liner (that you will add in the next step) against any rocks or sticks.
Line the Pond
Once the area has been prepared, purchase a pond liner from your local supplier. Your liner should be 4 or more feet longer and wider than the dimensions of your pond. Next, center the liner over the hole, with 1-2 feet of excess liner on one side and the rest on the other. Secure the shorter amount of excess liner with a few large stones or other weights to keep it in place. Beginning with this side, press the liner down along the edges and bottom of your hole, paying special attention to crevices and cracks. Work your way around the pond, smoothing out creases as they appear. Finally, secure the liner with rocks and trim so that only 3-4 inches of excess liner are visible.
Fill and Install
Once the liner is secure, you can begin filling your pond, pulling the liner taut on each side as needed. If you’re installing a pump, now is the time. Thread your pump’s cord through a PVC pipe for stability and situate it between a few rocks in a way that looks natural. Next, secure and conceal your hose in a similar manner.
Decorate
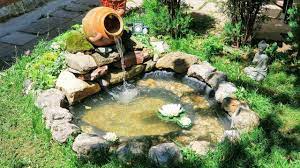
Arrange decorative rocks and stones around the border of your pond to conceal any extra liner and make your pond stand out against the rest of your landscape. Add water lilies, koi fish, and other organisms to make your pond more vibrant and enchanting.
And voila! You’ve just built your very own garden pond!
Affordable Dreams Landscape provides beautiful custom water features for homes throughout Utah.